Friday, July 16, 2021

Singer Featherweight: A Great Straight Stitch in a Cute Little Package


 Meet the Singer 221, also known as the Featherweight. Compared to other Singers of its day, this one is very light, tipping the scales at a mere 11.8 lbs. Packed in its case with all of its attachments, it still doesn't exceed 20 lbs, so I guess that's why they nicknamed it the Featherweight. 

Quilters love it because it's cute, portable and creates a lovely straight stitch. The standard foot is also a good width for making 1/4" seams, the standard seam for quilting. 

This Featherweight was created September 19, 1945. It came in a black case with all of its attachments and its manual. 

Time for the Featherweight fashion show:

Inside the box is a little shelf that holds the attachments, bobbins, foot pedal and lubricant. I'm sure it could be more organized than this, but that's how I packed it last.

View of the inside of the top of the box. I find the abstract grey/black paper there retro and full of personality. 

Inside bottom of box. Note the oil can on the left - there's a bracket made especially for the oil can. The markings on the right side of the cardboard match the veins on the bottom of the machine.

Front view of the 221

Close look at the stitch length adjustment lever and Singer badge.

Top view. It's very compact.

Top view with the extension table flipped up into "packing" position.

Front view with extension table flipped up.

Bobbin case underneath the extension table.

Lovely swirls on the side plate. Many of my other Singers have either straight lines here or they're plain. I adore the swirls and curliques. 

Close up for detail on plate. The white dot is a little circle of felt glued to the screw that hold the plate on. The felt prevents the extension table from being scratched by the screw when it's folded up. 

Back view of machine

A peek at the gearing underneath the plate that holds the spool pin. Don't forget to put oil in there!

Right Side view 

Bobbin winder. This looks a little odd to me. I wonder if I'm missing a rubber piece that goes over that metal wheel? Most other Singers have a rubber "tire" that engages the wheel to wind bobbins. 

View of the underside of the machine. Pretty good shape.

The serial number

Oil can that came with the machine. It was empty when I purchased the machine. I use a modern oiler because I don't want to damage the can by using it.

Some of the stuff that came in the case. Strangely enough there were TWO identical manuals. I also won't use the lubricant because it's vintage and might be rancid or worse.

The collection of attachments and tools that came with it. I find it interesting that there are two different size zipper feet.

Buttonholer with templates!! If you've never used one of these gadgets, they make a racket when you stitch the buttonhole. The attachment moves the fabric back and forth to create the zig zag stitches because the Featherweight (and most other machines of its generation) is a straight stitch machine. Each template is for a different size or style buttonhole. This one even came with the expansion pack of 4 additional templates.

This is the zig zag foot! Again, it moves the fabric back and forth to make the patterns. I haven't fiddled with this attachment, so I'm not sure how easy it is to switch among the patterns shown on top of the case. 

Featherweight sitting in its box ready to return to the shelf.

Accessories shelf loaded.

Case closed. 

And with that, the Featherweight bids you "good day".

HAPPY SEWING!!

Simple Silhouette Project: Eyeglass Case Labels


We just picked up our new glasses which replace our old prescriptions. Now, because it's ALWAYS possible that something could happen to one's current glasses - accidentally smash them or lose them - it's good to keep a spare pair. The most recent previous prescription is the best choice for emergency replacement since it's the closest to current prescription you can get. 

We have some other older glasses which we have kept because we like the frames and intend to reuse those frames later. I'm sure that happens to all of us - we really like our old frames and want to reuse them a few times - so we need to not only store them, but also be able to quickly identify them.

Right, so the end result is I don't want to confuse my computer glasses with my regular glasses or with my husband's glasses. We also want HIM to be able to find HIS old glasses easily without having to check the contents of all the cases. So, what to do?

 LABEL all eyeglasses cases!!! 

 Creating nice labels is an easy task for the Silhouette Cameo 4 and Silhouette Studio. 

I wanted a rather LARGE and BOLD font, so I chose Gill Sans Ultra Bold. This font is available free from DaFontFree.net


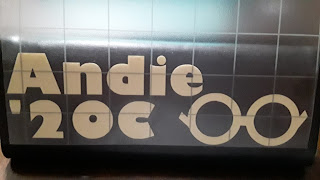
So, using Gill Sans Ultra Bold, I typed out our names and the prescription year. The '20R means "2020 Regular" and '20C means "2020 Computer" because I have both regular (for regular use like driving and doing whatever) and computer (main focal length is ideal for computer use) glasses. Guy - my husband - has just one set of glasses because he do doesn't need or want computer specific glasses.

The glasses image I pulled from an SVG of an glasses-wearing Easter Bunny. I'm sure glasses images are available all over the place. If you can't a good glasses image you like, you could use a pair of circles with lines linking them and little lines at angles coming out from each side as a simplified eyeglasses image. Glasses style isn't important, just that the image conveys the concept that eyeglasses are within the case. 

Resize the designs to fit your eyeglasses cases. 

Our eyeglasses cases have 3 faces that are approximately 6 1/2" wide by 2" tall, so I sized my labels to fit those dimensions. Carefully adjust the dimensions of the design to fit the destination item. I reduced the vertical line spacing to 75%. 

After sizing the design, I added "weeding lines". What are "weeding lines"? you ask....


"Weeding Lines" are extra cut lines added to a design to make weeding easier and to help reduce wasted vinyl. Since the three items I created will cover only a small portion of the 12" x 12" piece of vinyl, I want to save the rest of the sheet for another project. The weeding lines help to separate the current project from the remainder of the vinyl. I also added "weeding lines" between each individual design so I would have smaller pieces of vinyl to pull off.

In Business Edition, the weeding lines can be automatically added, but in other editions, they can only be added manually. 

Select the LINE tool. 


Click on a starting point. Move the mouse to the ending point and click again to place a cut line on the design. If you want a straight horizontal line, hold down the SHIFT key after clicking on the first point, and continue holding the shift key down until after you release the mouse button. Vertical lines can also be controlled in the same manner (shift key forces exclusively horizontal or vertical lines). 

If you didn't hold down the shift key and wound up with an angled line instead of a horizontal line, it can easily be fixed. 


Click the mouse on the point at the center top (the square the mouse pointer is pointing at above), then pull that down toward the square below. This will change the angle of the line to horizontal. 

To make another horizontal line, select the line you just created.


Hit ctrl-c (both the CTRL and the C buttons at same time) to COPY the line. Then, hit ctrl-v (both the CTRL and the V buttons at the same time) to PASTE a copy of the line. Move it to the next location where you need a weeding line. It can be resized by pushing or pulling on one end of the line.

If you need to change the line from horizontal to vertical, that can easily be accomplished using the Transform panel. With the line selected, click on the Transform panel button on the right side menu.


In the transform panel, click on the 90* button to rotate the line 90 degrees. 

Add additional lines as needed to box in all designs on your mat. 

By adding these cut lines, the pieces of vinyl being peeled off during weeding are much smaller and easier to manage. Also, it ensures that the vinyl left over has a reasonably straight edge so that the vinyl can be used later on for another project.  


Put the vinyl on the cutting mat. If the mat is old, glitter encrusted and not particularly sticky, be sure to use a brayer to help it stick to the mat - there's nothing worse than a project coming loose half way through cutting. My mat still has a bit of life left to it. I figure that if I can pick up the mat, flip it over and shake it without the vinyl falling off that it's still OK to use.  

My tools: Brayer, tweezers and dental pick. 

The brayer and tweezers set I picked up at Amazon, and the dental pick is something that I've had for so many years, I don't recall exactly where it came from, but it's pretty common because it looks just like the tool that my hygienist used on my teeth the last time I went to the dentist. 


Vinyl applied to the mat

Notice that this vinyl is already partially used - I made something earlier using this sheet of vinyl and simply cut off the corner where the other design was cut. I didn't use weeding lines that time and you can see that I failed to cut it perfectly straight. The weeding lines added above will allow me to use the vinyl for another small project that fits on the leftover piece and they will ensure that the edges left are straight rather than scissor-hacked.

If you are using vinyl scraps, be sure to check the design size and placement to ensure that the new design will fit upon the remaining scraps. Since the grid lines on the mat match the grid lines in Silhouette Studio, you can use them to help properly place both the vinyl and design to reduce vinyl waste.

Load the mat and hit SEND to start cutting.


One thing you may notice is that I have placed a 12" x 12" pad of paper underneath my mat. The pad is a little bit lower than the height of the bed of the Cameo. I have found that supporting the mat with either a book or a pad of paper helps with cutting. If the mat bends while cutting, the material can sometimes begin to lift off of the mat and mess up the cut. The consequence of a bending mat shows up most obviously when using the pens because the pens will drag on the cardstock that's lifting up behind the cutting tool. Since my mat is nearing the end of its life, having something support it will ensure that the vinyl doesn't pop off half way through the cut.

Side view of the paper pad showing that it's pretty close to the correct height. Something slightly thicker would work a bit better, but this is good enough for helping on this vinyl project.

As soon as it finishes cutting, I check a random spot on the design to see if it has been cut enough. In this case, the dental pick easily pulls up a weed-able piece in the middle of one of the zeros. Good to go.

Unload the mat and place it on a flat surface for weeding. I like to remove the vinyl from the mat so I can more easily bend the vinyl to pick at the smaller pieces that need to be weeded. 

Starting to weed. See how the weeding lines I added earlier allow a smooth separation of vinyl that needs to be weeded away and the vinyl I want to keep later for another project. I usually pull up the vinyl with one hand and use tweezers in the other hand to help separate the design from the vinyl waste.

Weeding completed. 

Apply transfer tape and smooth down with brayer to get it to stick completely.
Since the transfer tape piece was taller than my design, I placed the transfer tape backing on the table partially overlapping the vinyl backing so that the transfer tape didn't stick to the table.
 
 
Pull up the design and transfer tape, leaving the backing behind. The above photo is a view of the design from the sticky side (back side).


Place the design on the eyeglasses case. Smooth on with a brayer to ensure all parts have stuck to the glasses case.

Carefully peel back the transfer tape. 

Transfer tape can be reused multiple times - basically, keep using it until it no longer sticks to the vinyl or has picked up some debris. The used transfer tape can be restuck to its original backing for storage until next project. 

And TA DA! Three labeled eyeglasses cases. 


HAPPY CRAFTING!!

==========================

Free Christmas Graphics Bundle: FREE through August 8, 2021

The Free Christmas Graphics Bundle includes 20 premium graphic design sets, featuring beautiful Christmas watercolor elements, cute Santa Claus clip art, holiday featured SVGs and much more which can be incorporated in all your Christmas crafting

**This post may contain affiliate links. What that means is that I may receive compensation if you purchase through the links I have provided. The price you pay for the product or service is not higher but I may get compensated for sharing.

Monday, July 12, 2021

Fonts for Crafting: PART 4 - Installing New Fonts for Silhouette Studio

Welcome to Part 4 of my ongoing series about working with fonts for crafting. 

  • Click here for Part 1 (Font Basics). 
  • Click here for Part 2 (Using Glyphs). 
  • Click here for Part 3 (Using Warp).  

I Got New Font Files Now What?


I saw the adorably quirky font "Loving Kitten" available at Creative Fabric (it's FREE until 18 July 2021) and couldn't resist getting it. 

I clicked on the "Download" and a file called "Loving-Kitten-9959971.zip" appeared in my Downloads folder. A zip file is a compressed package that holds any number of other files. About all you can do with the zip file is "unzip" it. 

On the PC, go to the directory where files are downloaded - the standard location is your "Downloads" folder (most people don't change the default download location so it should be there but if you did change it, you should know where you redirected it). I usually sort it by File Date so that the most recently downloaded item pops to the top. 


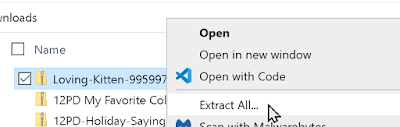
Right-click on the zip file and select "Extract All..."


Or, with the file selected, click on "Extract All" in the Compressed Folder Tools tab of the main menu in Windows Explorer.


The Extract Compressed (zipped) folders dialog should open. 


The folder where it will be extracted to will be listed automatically in the dialog box. If you wish to extract the files into a different location, click on "Browse..." then select another location on your machine. 

For this example, I'll simply use the default location, which is a new subfolder in my Downloads folder named similar to the zip file that I opened. 

After unzipping, you may either delete the original zip file, or move it to another folder. 

Browse to the folder where you unzipped the files. The Loving Kitten font is provided in two different formats - TTF and OTF. Both will work on a Windows PC or a Mac. TTF is the older font format known as "True Type Font" and OTF is "Open Type Font" which was based upon TTF but has a few improvements. Purists would say that OTF is better, but generally it doesn't really matter which one you pick. I usually choose the OTF because it's on top.


Right-click on the font name and select "Install for all users". The "Install for all users" option requires administrator rights on your machine. If this is your personal machine, you're probably the administrator. The computer will let you know if you aren't logged on as the Administrator and won't let you install it. If you are the administrator, it will immediately install the font. 


If you are not the administrator on your machine [common if you are using your work machine], you will have to choose the "Install" option, which will install the font exclusively for your user. 

Once the font has been installed, it will be available in all programs on your machine. 

If Silhouette Studio - or any other application you want to use the font in - was running when you installed the font, you have to close the application and then reopen it to load the font because applications only check for and load fonts when they are first launched. 

Here you see I have located the new font in Silhouette Studio and created a quick example cutting file using it.


If you use the free font management application Fontcloud, don't forget to upload your new font so it will be available there as well.

Enjoy your new font!

HAPPY CRAFTING!!


Sunday, July 11, 2021

Embroidery Adventures: REDLINE 1501 Stitches Shirts


Meet my Redline 1501. This is a 15-needle embroidery machine which is very much like the Tajima machine that one would find in a local embroidery shop (or they may just have the Redline instead! You never know). It stitches better and faster than a standard home machine. It comes with a nice collection of different sized embroidery hoops and a cap hoop (so you can embroider caps). 


Hoops I used today: the "A" hoop (550mmx350mm ) and the "" hoop, a 120mm round hoop.

Today, I put it to work stitching logos on 4 polo shirts and one woven made by me camp shirt for my husband who is a Patent Agent and has his own business. It's great advertising for his Patent business and for my embroidery business since some people ask him where he got his shirts printed and he send them to me. 

I tend to do small runs of embroideries as opposed to most shops which typically have a minimum order amount. Since I don't sell caps or shirts, customers provide their own embroiderable items. An advantage is that this means a customer can prewash the garments - and discover whether or not it shrinks to a too small size - before embroidering. They can also try on the garment before embroidering to ensure it will fit properly. 

How many times have you gotten a shirt from your company only to discover that the sizing for the shirts is atypical and you now have a shirt 2 sizes too small with your company's logo on it? I have experienced that too many times to count. The "women's" sizes are sometimes 2 or 3 sizes smaller than normal sizes such that the so-called XL is actually about the size of a regular man's size small, rendering it way too small for me, and even if it can stretch enough to fit me it would squeeze me like a sausage casing and isn't the look one wants for work.

Back to embroidery and fun machines:

Redline embroidering "That Patent Guy®" above the pocket (Yes, that's his registered trademark)

Right side of the Redline on its stand. You can see the cap hoop and extra bobbins stored underneath on the stand. I added a mini shelf on the bottom so I could use the space to store tools and other items I'd need while using the machine. I think it needs one more shelf, but I can make do with what's there. 


Finished embroidery above pocket. Still hooped to show how it fits. Note how nicely the round hoops handle the fabric. Home machines often have square hoops that will result in wrinkled fabric near the corners. The wrinkles in the square hoops is what contributes to some registration errors that people experience with embroidering using home machines. Also, home machines don't always have free-arm embroidery - the Redline does what they call tube embroidery, which means a narrow tube is what the item to be embroidered has to fit over such that almost any fabric item can be embroidered without having to take it apart.

Left side of the Redline on its stand. You can see the cap hooping device attached below the machine and stuff stored underneath on the stand. 


Fronts of the 5 shirts embroidered today. Each shirt is slightly different, so it's nice to see that the Redline managed to embroider all 5 fabrics without issues. The only issue I had was with the white thread, which I later determined was due to a needle that needed to be changed. As soon as I changed the needle for the white, I had no more thread breaks. 

Adjusting the Hoop holders from narrow setting for the "E" hoop to wide setting for the "A" hoop. The Redline hoops are held on both left and right sides, making the hoop more stable. Most home machines only hold the hoop from one side, which can result in bad stitching because the hoop isn't held steady from opposing sides. 

Bolts tightened and in place.

Right side hoop holder being tightened using an allen wrench. Love the Warning stickers on this machine: you will die if you touch this in the wrong spot.

Dialog on the control panel. Release embroidery to switch from chest logo to back logo

Selecting the back logo

"Confirm embroidery" to pull in back logo for use. 

 Back logo loaded. 
Guess why I set this logo up to be embroidered upside down? 

Embroidering back logo. Note that I'm embroidering it upside down... hmmmmmm.

Yes, it ends up right side up... so why did I embroider it upside down? 
Answer: because the opening at the bottom of the shirt is much wider than the opening at the neck. The hoop is slightly wider than the shoulder width of this XL shirt. Yes, that shirt is men's XL, and the hoop is wider than that, so to ensure that the machine can cleanly embroider the full width of the logo, I turned the design upside down so I could put it into the machine bottom first to ensure that it cleanly embroiders. 

View from behind the embroidery head as it's embroidering

Operator's view of embroidering back logo

Looking through the neck of the shirt. The bright square is the tube where the bobbin lives. You can see the partial embroidery at the top of the image.

The back logos of the five shirts. I folded down the tops of the shirts so that all 5 could fit into the photo. I I didn't fold them neatly so the shirts are crooked and wrinkled, but there they are. 

Guy was very pleased with the addition to his wardrobe given that several of his shirts have worn out and he needed more new ones. At least this time we have a wider variety of colors for him to choose among.

If you have been thinking about getting a multi needle embroidery machine, do consider purchasing a Redline. It's a great machine at an excellent price point and is certainly much better than a single needle machine. 

Although all these designs are single color designs, the multi needle machines really shine when embroidering designs of many colors because the machine can change colors without user input. 

A hat I embroidered. Digitized the design, too.


Fun with Cricut Infusible Ink

  I broke my favorite coffee mug a few days ago 😭.  Naturally, that means I need a replacement, and of course nothing available on the mark...