Saturday, February 19, 2022

Proper Training for my Cricut Joy


Just like one has to send their dog to obedience school, so, too, can one send the Cricut to "Cricut Kickoff". 😁

Just kidding... you don't HAVE to attend Cricut Kickoff to ensure your Cricut is well trained, however, since it covers a lot of the basics, it's a great way to learn about the machine and the accompanying software. 


Cricut Kickoff is hosted by Jennifer Maker, a well-known Celebrity of the crafting world. Her site offers a ton of Cricut training and fabulous tutorials for all of the FREE SVGs she offers. You have to subscribe to her newsletter to gain access to her Free SVG Library, but it's totally worth it - the newsletter is free, and every one contains a plethora of awesome information (or links to blog posts she wrote with detailed instructions.

The Cricut Kickoff is occasionally repeated live - you'll be notified of next live one in Jennifer Maker's newsletter - but you can always sign up for it and watch the recorded videos. The main advantage of watching it live is that you can as Jennifer questions while she's teaching the course. Each video is dedicated to a particular machine - so if you have a Joy, you could choose to only watch the Joy videos. If you have a Cricut Maker, you'd watch the Cricut Maker videos, or if you have an Explore, you'd watch the Explore videos. 

The first "day" of videos covers unboxing and setting up your machine. There's a video for each different Cricut machine. The second day's videos talk about mats, blades, pens, and other tools, and when to use which ones for your projects. Again, the videos are separated by Joy, Explore and Maker to ensure that each machine's special tools are discussed. The third and final day of videos is an easy introduction to Design Space in which you can create a simple project along with Jennifer Maker. There are videos for iPhone/iPad, Android users, and desktop/Laptop versions. Watch some or all of the videos, depending upon which are applicable to you. 

What's the little project? Oh, it's this:

The "I did it" success certificate for having made it through the training. It's a postcard type certificate with cutout designs for the "I did it" trophy side (note that the certificate has little tabs in each corner. Those are slots for the edges of the backing page to slip through). This training will empower you to go on and make more cards as soon as you find out how easy it is to create. 


Here's the view in Design Space as Joy is working diligently on creating the "Certificate of Completion" (the project for the training).


Here's my little Joy completing the back side of the certificate. In this case, we are using the pen included with the Joy to write some words. Let's watch her write...


Joy working hard on the certificate. 


And she finished! You can see the full text in the image above. 

If you haven't unboxed your Cricut or are unsure of how to get started, I strongly recommend that you check out this Cricut Kickoff training. It'll certainly get you started on the right foot!

HAPPY CRAFTING!

Wednesday, February 16, 2022

Making Bread Bags for My Husband


My husband doesn't often ask me to make things for him, but when he does, I make time to create the item for him as soon as I can. Lately, he has started baking bread - bagels, rye bread, and croissants. It's delicious. 


The problem is that he doesn't have a proper container to put the bread in, so usually it gets stuffed into a grocery bag - yeah, a bag that previously held our groceries, so not exactly the best thing for the bread. I mentioned to him that I thought that reusing grocery bags as bread bags could be a potential problem because we really don't know for sure what crud is in the bag from the prior contents. In addition, the plastic bags can hold moisture which could result in moldy bread. Not a good thing.

He asked me to make some bread bags from white linen since that's what most cloth bread bags are made from. When I asked what size, he handed me his loaf pans. 

I pulled out my 5 yard piece of white linen and got started. First, I wrapped the linen loosely around one bread pan to see how much material would be needed, and tore off a strip from the end of the yardage that was the measured length (I never took a ruler to it because I could measure it simply by using the bread pan as the "measuring stick").  I then cut the fabric into three pieces - a longer one that would be good for his longer bread pan and two that would be for his shorter bread pans. This way, I would use up the whole width of the fabric. 

A bread bag is very simple: 

  • Cut a rectangle that's big enough for the bread you want to contain - slightly larger than the bread pan so that it can be tied shut around a loaf of bread the size of the pan. 
  • Fold the rectangle in half and stitch two sides leaving the "top" open to put the bread inside. I used my overlock machine so that the edges wouldn't fray. Another option would be to sew it using French seams or to bind the seam allowances.
  • Double fold the top and stitch around to finish the opening
  • Stitch a piece of ribbon to the side so it can be tied shut. 


Pro tip on the ribbon: if it is polyester or other synthetic material, cut the ribbon using a hot knife to melt / seal the ends so the ribbon doesn't fray. 

I looked at the finished bags and said, "they need something to make them personalized."

I opened Silhouette Studio and started designing. The finished width of the bag when laying flat is 8.5", so I made the width of the designs just over 6" wide. I found a drawing of a pair of baguettes which I imported and traced. I then duplicated the baguette and sliced out the inner lines to create two layers for the bread.  

I used the "Warp" feature to curve Letourneau & Bakery so they could surround the bread. The other words I just left in their original configuration. I shuffled the images around the mat so that I could fit everything on one mat and cut it in a single run. 


I carefully checked the layout of the designs and placed scraps of HTV in the corresponding locations. I don't have any real tan or brown HTV, so I made do with gold and antique gold instead. 


The cameo happily cutting the designs. It's great that multiple designs can be cut on different materials all on the same mat so I could cut everything at once.

As soon as it finished cutting, I weeded everything and placed the designs on the bags. I trimmed the plastic backing closely around the words so I could lay everything out where it belonged.


I started with the words and the back part of the bread. Pressed it using the Easypress for about 10 seconds, then pulled off the backing from the bread. 


I added the inner part of the bread over the first part of the bread.


Cover the design with teflon sheet to protect the heating surface of the Easypress 2. 


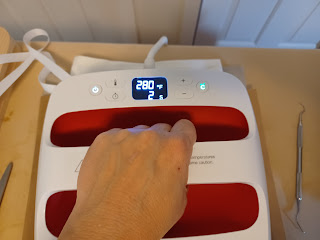
Ten seconds at 280, then remove


The completed "Made with LOVE" bag


Of course, we have to have one "Letourneau Bakery" bag  


The three bags completed. They are long enough to fit the bread and be tied shut or simply folded over. 

The good news is that my husband LOVES them. Shortly after I finished them, I noticed one already in the refrigerator holding some of his home-made bagels. The cloth bags help keep the bread fresh longer than plastic bags because they better control the moisture to keep the bread fresh and mold-free. Huzzah.

HAPPY SEWING and Happy bread storing!

Monday, February 14, 2022

New Pillowcases for Body Pillows


Body pillows are extra long pillows commonly used by side sleepers who like having their knees and arms propped up when sleeping on their sides. The pillows are typically about 18" x 48" (plus or minus a bit), and require longer than standard pillow cases. The pillow cases that come with the body pillows don't always stay on well, and usually don't come in colors that match your duvet or room decorations. 

For our body pillows, I decided to create zippered pillow cases using fabrics that we thought were fun. First, measure your body pillow - they all are not exactly the same size. I wrapped my measuring tape around the pillow and divided by two. I then took that number and added 3" ease. This provides 1" of seam allowance (1/2" x 2, because 1/2" for each end), plus 2" extra to make it easier to pull over the pillow. The extra also allows for shrinkage of the fabric (I always prewash my fabrics because they can shrink, and sometime 100% cotton will shrink in subsequent washes and dryer sessions).  


To remove the selvages efficiently, snip about 1" inward, then grab the selvage and pull the length of the fabric, tearing along the line you started. 


The selvages will tear away along one of the grain threads producing a straight "cut" edge. You will still want to iron the edges to remove any waves that are created when tearing the fabric. Snip and tear along the other direction to create two rectangles of the dimensions required for your pillow. 

My pillow measured 36" x 96" (for full circumferences), so my rectangles turned out to be (36/2) + 3 = 21" by (96/2) +3 =51". If you want to make it a little wider or longer to avoid leaving scrap fabric, you can - it's OK to have a pillowcase that's oversized, just don't make it too much larger than required. 


Align the front and back - check that the design is oriented the right way for each side. The zipper goes on the short end and usually the zipper end is considered "top" for one way designs. If you have a print that works the other way, confirm that the fabric is oriented the way you want it to be before sewing anything. 


Lay the zipper on one piece of the fabric right side facing right side of fabric. You can pin the zipper to the fabric, if desired. 


Attach a zipper foot, aligning the needle on the left, and the zipper/fabric also to left. Stitch close to the zipper teeth (not so close that it's "too close" such that the zipper can't function, but not way far outside where the zipper is barely held on the fabric). 


Flip the zipper to the back so that you see the right side of both zipper and fabric. Straighten everything and iron with steam iron to press the fabric in place. The fabric should be about 1/8" (plus or minus a bit) away from the zipper. Check that the zipper pull can freely move back and forth without catching on your fabric. 


Topstitch about 1/8" from the fold to hold the fabric in place so it won't creep up and catch in the zipper. 


Lay the second pillowcase piece down over the first piece and zipper. Ensure that the left and right sides are aligned. The top of the back piece should align with the zipper tape edge.


Using the zipper foot, stitch along the zipper tape close to the zipper. 


Unfold the backside and align along zipper tape. Use your iron to press in a crease to keep the fabric in place. Topstitch to match the other side and to keep the fabric of the back side from getting caught in the zipper. You can test the zipper by unzipping and zipping the zipper tape. If it gets stuck, you may have to unstitch some top stitching and restitch it further from the zipper teeth. 


Unzip the zipper about half way. 


Align the ends of the zipper on the open side. Pin in place.


With regular sewing machine, stitch from the zipper about 1/2" then reverse to the beginning and stitch all the way to the end of the pillowcase. The reverse here locks the zipper closed. 


Repeat on the other end of the pillowcase.

Double-check that you left the zipper at least half open! (last chance to fix if you missed that)

Finally, stitch across the bottom of the pillowcase.

I prefer to have most of the inner edges serged so that the fabric doesn't unravel. 


Ensure that the serger's needles are at their higest point, then lift the serger's presser foot and put the pillowcase under the foot so that the zipper tape is at the needle (cutting zippers with serger knife is not recommended, so we serge from beyond the zipper). Serge the seam to finish the edges.

Repeat on other side. 

Finally, serge along the bottom of the pillowcase. 

Reach through the opening of the zipper and turn right side out. 


Iron flat along all sides. 

DONE!!

Pillowcase with pillow inserted (zip up the zipper to ensure that pillowcase stays on pillow!)


Both pillowcases I made. Note that one pillow is shorter and narrower than the other. This is because they are not all exactly the same length or width.

Enjoy your new pillowcase!!

HAPPY SEWING!

Thursday, February 10, 2022

Christmas Card Making with the Cricut Joy


Instead of purchasing Christmas cards this year, I decided to use the card mat on my Joy to help me make some cards. I have a small box of blank cards that have been sitting in my craft room for more than 5 years, so I figured it was about time that I did something with them besides storing them.

The Joy is the only machine that has a "card mat". This is a special mat with a sleeve in it which allows you to cut the front of a card without having to stick the whole card to the sticky mat. This is great especially when working on the inside of the card because it means that the cut out front doesn't have to be stuck again to the mat (risking tearing the front while making the back of it). 

Making cards using the Joy is a breeze. I uploaded a "Gingerbread Man" insert card I got from "The Bearded Housewife". This card uses both the pen and the cutting tool.

First, it cuts out the gingerbread man outline and the tabs for the insert.


Cricut Design Space shows the progress as the design is cut.


Joy cutting out the Gingerbread man. The back portion of the card is in the slot within the mat. 


Next, we switch to drawing mode, so I had to replace the cutting tool with the pen that came with the Joy.


It writes a little differently than how a person would write. It will move across drawing parts of several letters and then go back and finish those letters later. It also hops from side to side, sometimes writing "backwards" and other times drawing things seemingly out of order. 


I'm not sure if the writing happens in the order that the writing was created or whether the software decides when to draw which lines. I suppose that as long as all of the lines appear on the card that we're doing it right. 


Final front of the card with a piece of red paper as the insert to fill in the cut out pieces. 

The next step was to unload the card mat, fold the card around the other way, and then let it write "Merry Christmas" on the inside. 

Quite fun, indeed.

I also made a second card. This one was an insert card with an angel on it. The Joy's card mat again allowed me to create this easily and quickly. The little surprise in this card is that the Angel and one star are to backed by a different color paper. The cut file came with a cutout piece for them, so all I had to do was glue the yellow angel to the back of the card's front piece, then slip in a rectangle of white to fill in the rest. 


OK, if I had read the tutorial, things would have been slightly different - we're supposed to switch to the pen for the second copy of the angel, not cut it out on paper and then glue it to the backside of the card front. Next time I make it, I'll do that, however, I do like this version with the angel being a different color from the rest of the background. I guess either version would work fine. 


The final step was to draw "Merry Christmas" for the inside. Since the card I used was dark green and I only have a black pen for my Joy, I had to cut out a piece of light colored paper, have Joy write the message, and then glue that paper into the card. 


And that's all that's needed for making cards with the Joy! I can't wait for an excuse to make more cards. I think I will make a Valentine's Day card for my husband. Stay tuned.

HAPPY CRAFTING.


Tuesday, February 8, 2022

First Foray into Card Making


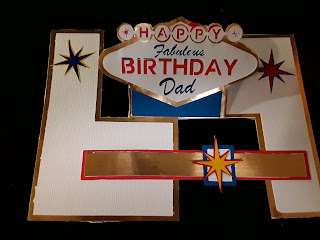
Up until just recently, I have never created a card using my machine. I decided it was about time to give it a go. On Jennifer Maker's site, I stumbled upon the "Impossible Card template".  After reading through her tutorial I thought that it would a fun card to create for my Dad's birthday. I downloaded the template, closed my browser, and went to work making it. 

The first struggle I had was finding the right color cardstock in my stash. I simply did not own primary color cardstock. The good thing is that I have a lot of permanent vinyl in many colors, including the colors I needed for the card. I applied some shiny gold vinyl to white cardstock to use for the background pieces. I created the red, yellow, and blue from vinyl applied to cardstock.  

The next roadblock I had was weeding the extremely small letters. The blue and white letters shredded so badly that they weren't useful. I tossed them and simply cut out the lettering in just vinyl. 

Remember that I mentioned that I had closed the browser? Big mistake. While gluing things together, I discovered that I was short two red circles (they go behind the cut out white to make the word "happy"). I wasn't actually short any red circles - I had started gluing the red circles on from the leftmost location, even though the first and last spot (with the * in them) were supposed to be backed with gold. Oh well, Dad won't know the difference, right? I cut another pair of circles and filled that in.  

Lesson learned: always keep the tutorial open when making something for the first time. 


HAPPY CRAFTING!!

Sunday, February 6, 2022

I'm Fine, Everything is Fine Tshirt on Silhouette


Christmas 2021 was the first Christmas without my Mom - she passed away 5 March 2021 - so the holidays were different from usual. Everyone adjusts to changes differently, so I found a way to express my attempt at adjusting. "I'm Fine. Everything is fine" seemed to just about describe how I was doing over this past Christmas...for the most part. Yeah. OK...

The design I chose was from Creative Fabrica. It's called "I'm fine, Everything is Fine Tangled".  


The design has a tangled mess of Christmas lights and the saying along the top and bottom. 

I decided to slightly modify the words of the design, so after I imported it into Silhouette Studio, I deleted the words and selected the font "Mirogate" from Creative Fabrica as the font for the words. I chose Mirogate because I wanted a tall and narrow font that would only take up one line for the text. This allowed me to maximize the width of the tangled lights design to fit within the 12" x 12" material size. 

I sent the design to my Cameo4. I used Black HTV for the wiring line and lettering. Since it's HTV, I mirrored the whole design before sending. 


The reversed design may look funny, but HTV has to be cut reversed because it's applied to the material with the backing facing up (backwards to regular vinyl). 


My cameo working on the complex wiring lines of the design.


Weeding was a minor challenge - I had to look carefully at the design on screen to make sure that I was removing the correct sections of black material. I really like using the dental pick because it can grab the HTV and lift up the pieces with minimal effort. 


Weeded design. Well, at least the black part. I used my Cricut Easy Press 2 to press the HTV onto my t-shirt. 

Next, I cut each of the bulb colors. 


After cutting, I realized I could have rearranged the bulbs to all be aligned in a little line. However, by cutting them out on HTV in their respective locations, I was able to easily determine where each bulb belonged. When I weeded the HTV, I carefully cut it so  that I created the most direct path to the next bulb. This kept the bulbs aligned to their destinations and reduced the amount of HTV wasted in each of the colors. I have since used many of the remaining odd shaped bits in other projects. 


There were five colors of lights to be placed properly. I'm glad I decided to have the lights cut in their locations. Even though that may have "wasted" HTV, it certainly made it easier to determine which bulbs were to be which colors.  


The final shirt, which I wore on most of Christmas Day except for Christmas Mass (because I wore a dress for Mass because a t-shirt was too sloppy for Church). I think it worked out fine, and I'll probably wear it again next holiday season just because. 

HAPPY CRAFTING!


A Tale of Two Singer 15s : 1921 vs 1953. What Changed? What Stayed the Same?

 In my last post, I introduced my "newest" (yet oldest) Singer 15 ~ a Singer 15 manufactured in 1921 .  This wasn't my first S...