
My husband doesn't often ask me to make things for him, but when he does, I make time to create the item for him as soon as I can. Lately, he has started baking bread - bagels, rye bread, and croissants. It's delicious.

The problem is that he doesn't have a proper container to put the bread in, so usually it gets stuffed into a grocery bag - yeah, a bag that previously held our groceries, so not exactly the best thing for the bread. I mentioned to him that I thought that reusing grocery bags as bread bags could be a potential problem because we really don't know for sure what crud is in the bag from the prior contents. In addition, the plastic bags can hold moisture which could result in moldy bread. Not a good thing.
He asked me to make some bread bags from white linen since that's what most cloth bread bags are made from. When I asked what size, he handed me his loaf pans.
I pulled out my 5 yard piece of white linen and got started. First, I wrapped the linen loosely around one bread pan to see how much material would be needed, and tore off a strip from the end of the yardage that was the measured length (I never took a ruler to it because I could measure it simply by using the bread pan as the "measuring stick"). I then cut the fabric into three pieces - a longer one that would be good for his longer bread pan and two that would be for his shorter bread pans. This way, I would use up the whole width of the fabric.
A bread bag is very simple:
- Cut a rectangle that's big enough for the bread you want to contain - slightly larger than the bread pan so that it can be tied shut around a loaf of bread the size of the pan.
- Fold the rectangle in half and stitch two sides leaving the "top" open to put the bread inside. I used my overlock machine so that the edges wouldn't fray. Another option would be to sew it using French seams or to bind the seam allowances.
- Double fold the top and stitch around to finish the opening
- Stitch a piece of ribbon to the side so it can be tied shut.

Pro tip on the ribbon: if it is polyester or other synthetic material, cut the ribbon using a hot knife to melt / seal the ends so the ribbon doesn't fray.
I looked at the finished bags and said, "they need something to make them personalized."

The cameo happily cutting the designs. It's great that multiple designs can be cut on different materials all on the same mat so I could cut everything at once.
As soon as it finished cutting, I weeded everything and placed the designs on the bags. I trimmed the plastic backing closely around the words so I could lay everything out where it belonged.
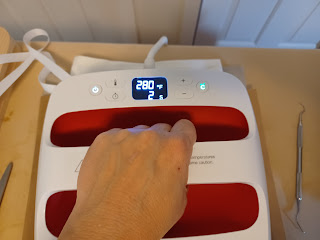
I started with the words and the back part of the bread. Pressed it using the Easypress for about 10 seconds, then pulled off the backing from the bread.

I added the inner part of the bread over the first part of the bread.

Cover the design with teflon sheet to protect the heating surface of the Easypress 2.


No comments:
Post a Comment