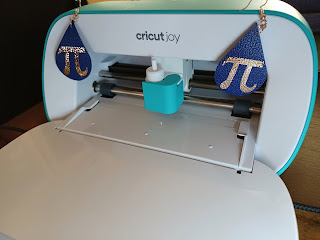
March 14th is sometimes referred to as "Pi" day because π is an irrational number that begins 3.1415926.... Having majored in math, I appreciate the fun that we can have with certain dates, and decided that this year I'd have special π earrings for the occasion.
Creating earrings of this style is quick and easy on the Cricut Joy or the Silhouette Cameo 4. Although one could make earrings from faux leather using just the letter π, I decided that it would be better to cut it out from HTV and iron it onto faux leather.
I'll first describe how to create the earrings using a Cricut, then I'll repeat the tutorial for Silhouette users.
Creating π Earrings in Cricut Design Space
First, we need to create the teardrop shape for the earring background. The free shapes do not include a teardrop, but one can easily be made by combining shapes. Insert the triangle and the circle from the Shapes menu.
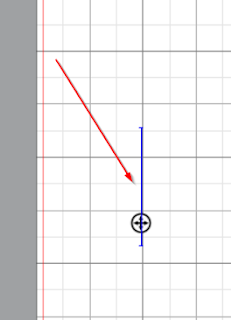
Move the triangle so it slightly overlaps the top of the circle and somewhat resembles a teardrop.
Since the triangle doesn't quite line up perfectly with the circle when placed along its top - it's just a bit too wide - we need to reshape the triangle to fit. Unlock the Triangle and reduce its width until its bottom corners line up with the edge of the circle and none of the circle shows above the triangle. You may wish to change the color of the circle to see the edges more easily for this step. I changed my circle to red.
My triangle lined up well once its width was reduced to 1.833".
Select both the triangle and the circle. Click on "Weld".
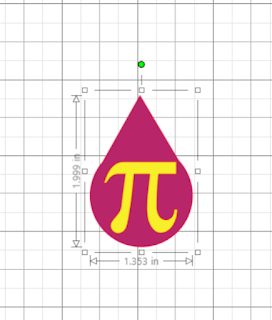
You will now have a single teardrop shape on your screen. Earrings work best when sized to between 1.5" and 2.5" tall. I resized these to 2" tall.
We now need to grab the π character. On Windows machines, you can use the built in App called Character Map to locate the additional characters which you cannot type when hitting keys on the keyboard. You can locate it by selecting search from the task bar and typing in Character Map.
Launch Character Map and choose your favorite font, then scroll down to locate π. I found that both
Times New Roman and
Castellar have attractive renditions of π, and since they are both built-in system fonts all Windows users should have them. Mac users should have something equivalent to Times New Roman since it's considered a "standard" font.
Click on the π, then click on "Select" and "Copy" to put a copy of π in your computer's Copy/Paste queue.
Go back to Design Space and click on the "Text" button.
This will add a text box containing the word, "Text".
Click inside the text box and select all the letters in the word. Hit <ctrl>-v to paste the π in the text box. If all you see is a rectangle, check your font choice in Design Space.
The empty rectangle indicates that the character is not available in the selected font, which is most likely the Cricut font that DS text boxes default to when you first choose the Text tool. Change the font to either
Times New Roman or
Castellar and the rectangle should be replaced with π.
Move π over the teardrop to check its size. Resize π to fit inside the teardrop.
Change the colors or leave them as is - your Cricut won't know which colors you have chosen to cut out your design. Click on "Duplicate" to make a second copy of the earring.
The earrings are ready to cut. I chose Navy Blue faux leather and copper foil HTV for my pair.
Click on Make It.
Click on "On Mat", then click "Continue" to go to the mats screen.
On the mat for the π, be sure to click on "Mirror" because π will be cut using HTV which always should be mirrored. The mat preview of the π should now look mirrored. Note the size of material required. I cut the copper foil HTV 2.5" wide by 1.3" high for this piece.
For the faux leather, I like to move the shapes a small distance away from the top and left side so there is room to tape down the faux leather. I tape the faux leather down using blue painter's tape to help ensure that it stays put while being cut. Sometimes, especially on older mats, the faux leather comes unstuck mid-cut, and the tape helps hold it in place so the material isn't ruined. Note the size material needed. For this project, I cut my faux leather 3 1/4" x 2 1/2". I usually try to err a bit on the larger size to avoid the risk of the machine cutting not exactly where it shows on the mat preview and not having any material where it's cutting.
Before adhering the faux leather on the mat, cut a piece of plain HTV that closely matches the color of the faux leather to the same dimensions as the piece of faux leather. Adhere the HTV to the back of the faux leather using a heat press. This serves two purposes: first, it hides the not so pretty white backing of the faux leather, and second, it slightly stiffens the faux leather so the earring won't curl over time.
Cut the faux leather with the HTV side facing up.
Once the machine finishes cutting, weed both the faux leather and the HTV. Adhere the π to the faux leather using a heat press.
I use a 1/16" hole puncher to punch holes in the tops of my earrings. If you don't have one, a thick sewing needle or T-pin should be large enough diameter to poke a hole in the tops of the earrings where you want to attach the ear wires. Use two jump rings between the earring and the ear wire. The extra jump ring helps turn the earrings so they face forward when you're wearing them.
You could also cut a second set of π from the copper foil HTV if you wish to have the back of the earrings bear the same design.
Creating π Earrings in Silhouette Studio
This will be pretty much the same process, so please refer to the Cricut directions, above, for additional details.
Making a teardrop is much easier in Designer Edition+ or Business Edition because those versions have flexishapes which provide a greater variety of options than the basic shapes. I will create the teardrop using the basic shapes.
In the shapes menu, you will need the regular polygon and the oval.
Click on the oval, then click on the mat canvas. Drag the oval to the desired size. When sizing the oval, hold down the shift key to force it to be a perfect circle rather than an oval.
Open the color palette and set a color for the circle so it's easier to see.
Next, select the Regular Polygon, click the mat and drag the polygon to a good size.
Look carefully at the middle of the polygon. There's a number 5, and what appears to be a slider in the middle of it. These items are in pale gray and are somewhat difficult to see, so moving the shape off the mat may help to make them more visible. The slider allows you to change the number of sides for the polygon. Move the slider to the left until the number shows 3 and you see a triangle.
Change to the pointer (SS may still be in "draw a shape" mode. Clicking on the pointer switches it to pointer mode) then drag the triangle near the circle. Set the triangle's color to yellow. Rotate and resize the triangle so it can sit on the upper portion of the circle, making a teardrop shape.
Once the two are lined up satisfactorily, select both, right-click, and choose Weld.
This will make the two shapes a single teardrop.
Resize the teardrop to 2" tall (or desired size between 1.5" and 2.5").
Click on the "+" magnifying glass to zoom in so you can see details better.
Click on the Text tool.
Click on the mat to place the text cursor.
On the right side of the window, click on the "A" icon to open the text style panel.
If you are running Designer, Designer+ , or Business Edition, click on the Glyphs tab and select a font - Castellar and Times New Roman have good looking π characters. Scroll through until you locate π.
Click on π and it will be added to the canvas.
If you have Basic edition, refer to the instructions for locating the character in the Character Map application in the Cricut section, above, then paste the π on the canvas.
Once π is in place, set the color so it's easier to see. Move it over the teardrop and resize it to fit in the teardrop.
Select everything then right-click and choose "
Copy" to create a second earring.
The Cameo cuts things exactly where they are placed on the mat. Arrange the pieces to see the amount of material required. In my case, the two teardrops fit on a piece 3 1/4" wide by 2 1/2" tall, and the πs fit on a 2 1/2" wide by 1.3" tall piece. Note down the sizes and cut your materials to the appropriate dimensions. I like to back my faux leather with a piece of HTV, so I cut a piece of HTV the same size as the faux leather and ironed it onto the back side of the faux leather before cutting.
Once you've determined the necessary material sizes, select the two π characters and drag them off of the mat image in Silhouette Studio. Move the teardrops to a location on the mat where you wish to cut them. I recommend that this location be the stickiest portion of your mat, which is likely somewhere near the middle of the mat. Use the mouse pointer crosshairs to check the exact location of the teardrops on the on-screen mat so you can match it on the physical mat.
Stick the faux leather to the mat with the "pretty" side down and the HTV / back side up. Tape around the edges of the faux leather with blue tape then click Send.
Select faux leather as the material. I usually raise the pressure to 30. Sometimes faux leather needs to be sent more than once to be cut all the way through, so be prepared to hit Send a second time once it finished the first cut. You can check whether it has cut all the way through by trying to lift up a corner of the teardrop. If it doesn't look like it has cut all the way through, run it a second time.
Once the faux leather has been cut, return to the regular mat view and switch out the teardrops for the π characters. Slide the π characters to the same location on the mat as where you placed the HTV (remember to make sure the HTV is placed shiny side down).
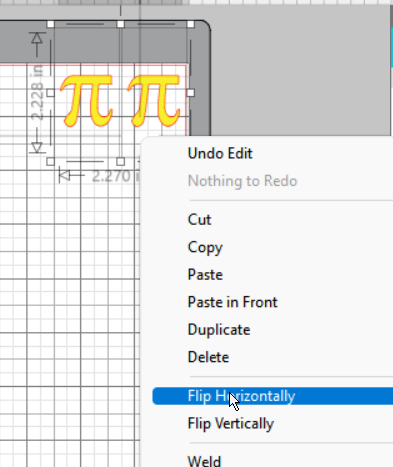
Select both π characters, right-click and select Flip Horizontally. You need to cut the letters flipped because HTV is always cut from its back side. Hit send, select HTV from the materials selection and cut the letters.
Weed out the extra HTV and iron the letters onto the teardrops.
I use a 1/16" hole puncher to punch holes in the tops of my earrings. If you don't have one, a thick sewing needle or T-pin should be large enough diameter to poke a hole in the tops of the earrings where you want to attach the ear wires. Use two jump rings between the earring and the ear wire. The extra jump ring helps turn the earrings so they face forward when you're wearing them.
You could also cut a second set of πs from the copper foil HTV if you wish to have the back of the earrings bear the same design.
HAPPY CRAFTING!! And HAPPY π DAY!!