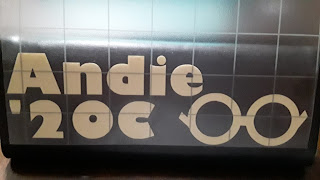
We have some other older glasses which we have kept because we like the frames and intend to reuse those frames later. I'm sure that happens to all of us - we really like our old frames and want to reuse them a few times - so we need to not only store them, but also be able to quickly identify them.
Right, so the end result is I don't want to confuse my computer glasses with my regular glasses or with my husband's glasses. We also want HIM to be able to find HIS old glasses easily without having to check the contents of all the cases. So, what to do?
LABEL all eyeglasses cases!!!
Creating nice labels is an easy task for the Silhouette Cameo 4 and Silhouette Studio.
I wanted a rather LARGE and BOLD font, so I chose Gill Sans Ultra Bold. This font is available free from DaFontFree.net.
So, using Gill Sans Ultra Bold, I typed out our names and the prescription year. The '20R means "2020 Regular" and '20C means "2020 Computer" because I have both regular (for regular use like driving and doing whatever) and computer (main focal length is ideal for computer use) glasses. Guy - my husband - has just one set of glasses because he do doesn't need or want computer specific glasses.The glasses image I pulled from an SVG of an glasses-wearing Easter Bunny. I'm sure glasses images are available all over the place. If you can't a good glasses image you like, you could use a pair of circles with lines linking them and little lines at angles coming out from each side as a simplified eyeglasses image. Glasses style isn't important, just that the image conveys the concept that eyeglasses are within the case.
Resize the designs to fit your eyeglasses cases.
Our eyeglasses cases have 3 faces that are approximately 6 1/2" wide by 2" tall, so I sized my labels to fit those dimensions. Carefully adjust the dimensions of the design to fit the destination item. I reduced the vertical line spacing to 75%.
After sizing the design, I added "weeding lines". What are "weeding lines"? you ask....
"Weeding Lines" are extra cut lines added to a design to make weeding easier and to help reduce wasted vinyl. Since the three items I created will cover only a small portion of the 12" x 12" piece of vinyl, I want to save the rest of the sheet for another project. The weeding lines help to separate the current project from the remainder of the vinyl. I also added "weeding lines" between each individual design so I would have smaller pieces of vinyl to pull off.
In Business Edition, the weeding lines can be automatically added, but in other editions, they can only be added manually.
Select the LINE tool.
Click on a starting point. Move the mouse to the ending point and click again to place a cut line on the design. If you want a straight horizontal line, hold down the SHIFT key after clicking on the first point, and continue holding the shift key down until after you release the mouse button. Vertical lines can also be controlled in the same manner (shift key forces exclusively horizontal or vertical lines).
If you didn't hold down the shift key and wound up with an angled line instead of a horizontal line, it can easily be fixed.
To make another horizontal line, select the line you just created.
Hit ctrl-c (both the CTRL and the C buttons at same time) to COPY the line. Then, hit ctrl-v (both the CTRL and the V buttons at the same time) to PASTE a copy of the line. Move it to the next location where you need a weeding line. It can be resized by pushing or pulling on one end of the line.
 |
| My tools: Brayer, tweezers and dental pick. |
The brayer and tweezers set I picked up at Amazon, and the dental pick is something that I've had for so many years, I don't recall exactly where it came from, but it's pretty common because it looks just like the tool that my hygienist used on my teeth the last time I went to the dentist.
 |
| Vinyl applied to the mat |
Notice that this vinyl is already partially used - I made something earlier using this sheet of vinyl and simply cut off the corner where the other design was cut. I didn't use weeding lines that time and you can see that I failed to cut it perfectly straight. The weeding lines added above will allow me to use the vinyl for another small project that fits on the leftover piece and they will ensure that the edges left are straight rather than scissor-hacked.
If you are using vinyl scraps, be sure to check the design size and placement to ensure that the new design will fit upon the remaining scraps. Since the grid lines on the mat match the grid lines in Silhouette Studio, you can use them to help properly place both the vinyl and design to reduce vinyl waste.
Load the mat and hit SEND to start cutting.
 |
| Side view of the paper pad showing that it's pretty close to the correct height. Something slightly thicker would work a bit better, but this is good enough for helping on this vinyl project. |
 |
| Weeding completed. |
 |
| Pull up the design and transfer tape, leaving the backing behind. The above photo is a view of the design from the sticky side (back side). |
 |
| Place the design on the eyeglasses case. Smooth on with a brayer to ensure all parts have stuck to the glasses case. |
 |
| Carefully peel back the transfer tape. |


No comments:
Post a Comment