
As a remote worker, I frequently have video calls. I have a Fujiwara Sai doll from the Anime Hikaru No Go with a sign saying "in the middle of a call" on my desk. When I'm on a call, I'll turn Sai so his sign is visible so my husband can easily see that I'm on a call.

The Sai sign works well in most cases, however, sometimes I'm on camera as well as on a call. Now even though I can blur the background or put up a fake background in Microsoft Teams, the software sometimes picks him up when he's moving around in the background. We both prefer that the other people on the call don't see him or know that he's sometimes in the room. Therefore, I decided I needed to enhance Sai's sign for times when I'm on a video call.
Thanks to my Cricut Joy, some cardstock and a bit of permanent adhesive vinyl, I made the sign enhancement.

This was a quick project that is easy to make with the basic free shapes built into Cricut Design Space. It could also be made in Silhouette Studio using similar techniques. I'll mention the differences as we go through the process.
First, I wrote "ON AIR" using the Aquarilla font, which I obtained from Creative Fabrica. This is a fun font with tall and thin letters. I sized it so that the letters were 0.86" tall.
Next, I selected a number of shapes which would help me build the camera:

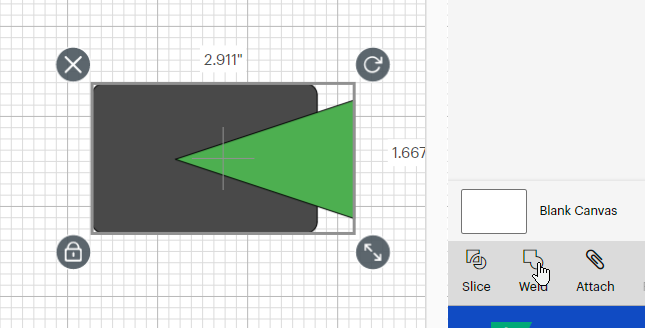
I started with the rectangle and kept its original size (figuring I'd resize the whole design once finished). I next selected the "nabla symbol" (aka isosceles triangle) and rotated it 90 degrees. I placed it on one side of the rectangle and adjusted its size to look like a camera lens.

For the image above, I changed the color of the isosceles triangle to make it easier to see. When I created this, all the shapes were black.
Next, I selected both shapes and clicked on Weld.

And after welding. Weld transforms multiple shapes into a single shape.
I then added two circles, one slightly larger than the other, to the top of the rectangle and welded them to the camera base. To make the openings, I created a smaller circle and changed its color to red so I could see it. I set it on the first film reel circle, and reduced its size until it looked like the right size for the hold. I then selected both the camera object and the red circle.

I clicked on Slice to cut a copy of the red circle from the camera.

When I slid the camera to the left, there was the original red circle and underneath it was a black circle which was the piece cut from the camera. I repeated the slice process to cut out the hole in the second film canister.
I wanted to make a tripod to hold the camera, so I added the stretched oval to the canvas.

I unlocked the oval so that I could flatten its shape. I fiddled with its height and width until it was the size that looked about right, then welded it to the camera.
Next, I took that cut out circle and added it to the bottom of the camera for the next part of the tripod. Selected both, and clicked Weld.

Finally, I pulled up the "Equal Sign" shape. I probably could have used the rectangle with unlocked shape, but the equal sign had squared off corners which the rectangle does not. I added a square shape and placed it on top of the top line of the equal sign, selected both and clicked Slice.

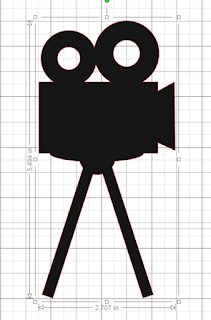
This separated the two lines of the equal sign. I deleted the square and the extra bit sliced from the square. I then selected the single rectangle that was left, unlocked it, and change the length and width to narrower and longer so that when it was rotated to a good angle for the bipod legs it looked about right. I then moved it into place, duplicated it and flipped it horizontally to have two mirrored legs and placed them at the bottom of the camera. Select ALL and Weld to finish the camera.
Finally, I resized the camera to 5.5" tall so that it would fit nicely on Joy's mat and would not be too big for Sai. I then moved the "On Air" text over the camera image and checked its sizing to see if it looked good before hitting "Make It".
I cut the camera using navy blue 65lb cardstock, and the "On Air" in fuschia permanent vinyl.
SILHOUETTE STUDIO NOTES:
In Silhouette Studio, the shapes do not appear in "standard" sizes, so you will have to set the shapes to appropriate sizes yourself. I prefer to create shapes using objects larger than I will use in the final product - the resulting shape can be resized after drawing it.
After creating the rectangle, you will have to use the diamond shape for the isosceles triangle.

Create the shape, then use a copy of the rectangle rotated to cover the bottom half so you can subtract the rectangle from the diamond, leaving an isosceles triangle.

The resulting triangle can be rotated and resized to fit to the camera shape. Weld to affix them together.
The two film reels can be added as "donut" shapes, and then Welded to the main camera.

In the regular shapes, there's an oval that can be used to create the top part of the tripod. Create the oval as a long and narrow shape and weld to the camera. Add a circle below and weld together:

Create a rectangle that's long and tall. Rotate about 30 degrees. Place at base of camera tripod. Create duplicate and mirror. Place on other side of tripod. Weld.


No comments:
Post a Comment