My husband recently has gotten into baking and bread-making. He asked me to make him an apron so that he doesn't soil his clothing while cooking. Of course I was happy to make one for him, but which style? I searched for a while and stumbled upon SAM's Apron, a FREE pattern from Helen's Closet Patterns. Just sign up for their newsletter (as of 11/13/2021, that works - I don't know how long it will stay as a free pattern), and you'll receive a link to download the pattern. The image above is of Sam Himself, modeling the apron.
SAM's Apron sounds perfect for him - all the other apron patterns I've come across usually only consider girth, but don't provide options for different heights. This apron has cut lines for people 5' to 6' tall in 4" increments, ensuring that the bib portion and the hem are appropriate lengths for people of varying heights. Huzzah.
Trim lines for different heights at the hem - select the length that works for you, whether you're 5', 5'8", or even 6' tall.
And, at the TOP of the apron, it has markings for different heights - and even lines for an FBA if you need that in addition to the height adjustment. These additional marking ensure that the bib goes up high enough yet the waist isn't too high. I selected the marking that matched my husband's height and he said it was "very comfortable" and "exactly what he needed".
The directions were very clear, and the apron went together very quickly. I used some denim I had in my stash.
Folding up the hems. My iron was set on "steam" and the fabric pressed down so smoothly I didn't even have to use pins to hold it in place.
The corners of the hems were especially thick because it's denim, so I used the height compensator to keep my presser foot level. The height compensator also help prevent skipped stitches and broken needles which commonly happen when sewing thick pieces. The Bernina 830 happily sewed everything I asked it to for this project.
Pressing up the hem using a hem template. Photo may appear blurry, but it's actually clear - the smearing is actually moisture from the iron's steam. The template got very wet and warm. I chose to use the metal Dritz Hem gauge because the Clover Hot Hemmer is made of a softer material and the denim was bending it when I was trying to pull the hem up to the line.
This is a shot of the Bernina height compensation tool that came with my Bernina 830. It has three plastic bars that allow the tool thickness to be adjusted depending upon the thickness of the material being sewn. If you need to place it at the front of the foot to keep the foot level, sew very slowly because the feed dogs may pull the tool in underneath the presserfoot and the needle could strike it and break.
This is the "other" kind of height compensation tool I have. It came with my Pfaff Creative Vision, and is known as a "hump jumper" (they are sold separately from Pfaff machines). This device does the same thing as the one by Bernina, except you can place it at the front of the foot and sew with it underneath for a short time because of the groove. The needle will puncture it if you aren't careful. You can see a small puncture in it on the bottom right where I hit it with the needle once.
Side view of the Hump Jumper tool. Each end is a different thickness, providing two options for height compensation depending upon the thickness of the material being sewn.
I haven't decided which version of the tool I prefer. I usually use the one that I find first when I'm digging for it.
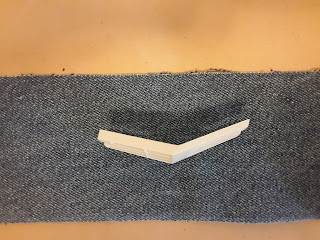
Apron all finished. I skipped adding the upper pocket and only installed the lower pocket (with 3 openings) because I was planning to decorate the upper portion of the apron with HTV and didn't want to have to deal with adjusting the design so that it would sit neatly above, on, and below the pocket. I think my husband is OK without the extra pocket since I didn't tell him that the pattern HAD another pocket.
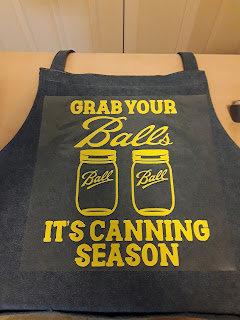
The design I put on the apron was something that my husband thought of. He enjoys canning and uses Ball brand mason jars and lids.
I took the Ball logo from their website and edited it slightly to add the letter "s" at the end of the word "Ball". The mason jars were from a drawing of mason jars I found online, which I had to trace to make the lines wide enough so they could be seen once cut in HTV.
After creating the design in Silhouette Studio, I set the colors of the design and mat to look similar to yellow text on denim so my husband could approve it. Finally, I mirrored the whole design because HTV gets reversed when applied to objects.
My Cameo doing its "thing": cutting out the HTV design. I was using yellow HTV, but the back of it was white.
Almost finished! This design took a little while to cut because it was 9" x 12" and there was a lot of detail in it.
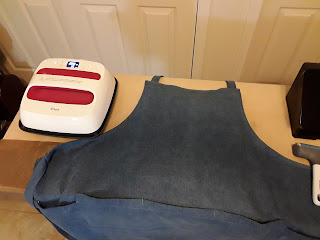
Pre-press the apron to smooth out the denim. I pressed at 335 for 15 seconds. Since the design was larger than my 9" x 9" Cricut Easy Press 2, I had to press the design several times in different areas to iron the whole thing down.
Freshly pressed and ready for the backing to be peeled off. I like that the backing for HTV is clear so that you can place your design, check that it's straight, and move it if necessary. The slight stickiness of the backing holds the design in place once you've decided where it ought to be.
I always use a sheet of teflon over the design to protect the Easy Press from getting goobered up from stray bits of HTV.
Close-up of the final design on the denim apron.
The lovely and ever patient dressform models the apron, showing how nice it would look on someone.
I figured it was OK to do a little bathroom mirror shot of myself wearing the apron. I didn't manage to get a photo of my husband wearing it because he's very good at dodging the camera.
HAPPY CRAFTING!!


No comments:
Post a Comment