Monday, November 22, 2021

Messerschmitt Sewing Machine


Remember Willy Messerschmitt? The guy known for creating aircraft for the Germans in WWII? Well, guess what he and his company were up to after the war... Messerschmitt produced some odd looking vehicles (in that same green color), and some sewing machines! 

This Messerschmitt is very light compared to machines of its era. It's made of aluminum and has a lot more open space within it than other machines, making it very light. If it had wings, the machine would fly!

I'm sure many Singer fans would instantly recognize certain styling that is reminiscent of the Singers of the early 1950s, but there are several features that Messerschmitt added which make this a unique machine. Let's check it out...


The Messerschmitt comes in its own suitcase. Ready for adventures!


Let's open the suitcase and see what's inside....


A pocket for holding the manual & attachments. The machine is strapped in and is nestled inside its wooden sewing table, ensuring that it doesn't slide around within the case.


The wooden sewing table in the case. This is a reproduction of the original - our Messerschmitt didn't come with a sewing table, but we have a good friend who is into woodworking who recreated the sewing table similar to the original. He included features which hold the knee lever in place and which ensure that the machine's stitch selectors are not damaged. 


All set up on the table with its knee lever engaged for sewing. 


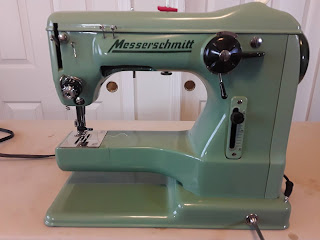
Close up of the front of the machine. Lovely industrial green color.


Top view. Check out the stitch selectors. You push a combination of the levers to the left to generate various stitch patterns. 


Side view of the machine. You can see the bobbin winder and the light switch.


These are the stitch selectors. You can move them up one at a time for a specific stitch, or move up multiple levers for a combination stitch. You need a stitch design decoder to determine which selections to combine to create specific stitches... 


Back side of the machine. 


Official tag on back of machine. Made in Germany. 


Left side of machine with official Messerschmitt logo. This is also the logo you would see on the Messerschmitt planes. 


Machine with its sewing table in place. 


Front view of machine with its sewing table. My woodworker friend chose very nice wood for this project. 


Top view showing the lovely wood grain and the fun selector switches.


The official attachment container. It's a rather stiff plastic fabric with the Messerschmitt label engraved.


Interior of the attachment container. Huzzah! We have many original attachments. Many closely resemble Singer attachments. I haven't tested to see if they are interchangeable with Singer attachments, but they look as if they ought to fit. Will have to test some day and report back on it. 


Close up of the attachments. Note the extra bobbin case I have. The knob across the front of the bobbin case helps hold the bobbin in place. Everything looks very similar to Singer attachments of the same era. 


This is the other half of the attachment case. The oil container is empty, but I'm glad that the original owner didn't throw it away when the oil ran out because it has the Messerschmitt logo on it. There is also a pair of brushes, a wrench, and two screwdrivers for opening the case as needed. 


Stitch sample. I'm not sure how old it is, but the fabric looks pretty old. The mostly straight stitching on the right was done by me when I was testing the machine in an attempt to check the tension.


The official manual. Thankfully, although it's from Germany, the manual is in English. There are a few inserts in German, but the rest is in English. 


The "Secret decoder ring" for stitch combinations. No, I haven't figured it out yet, but I have ideas for how to work with it. I don't often use decorative stitches, so in general I won't need it, but it's great that I have the thing to help with it if I choose to try some interesting stitch combos. 

HAPPY SEWING!!

Saturday, November 20, 2021

Pumpkin Pie Faux Leather Earrings - look yummy enough to eat. Where's the Pie?


As I'm preparing for our Thanksgiving adventures, I happened upon Amy Romeu's "How to Make Pumpkin Pie Earrings with a Cricut" article. Perfect choice for me - the ONLY types of Pie that I will eat are Pumpkin Pie and Chocolate pie. I never wear orange, but sacrifices sometimes must be made for the sake of fashion and delicious pies. 

Since I have a Silhouette Cameo 4 instead of a Cricut, the steps needed to create the earrings are only slightly different. The Basic Edition of Silhouette Studio cannot read SVG files; you must have at least Designer Edition to use SVG. I started with Designer Edition because I noticed that the majority of design files available free were SVG (because that is the default file format the Cricut uses). I have since upgraded to Business Edition so that I would have every feature available. 

Once you load the SVG into Silhouette Studio, select all (CTRL-A), and move the pie pieces off of the mat. 


There are two sets of the earrings - this is standard for all of Amy's SVG files - one pair with the hole pre-cut, and one without the hole. I always use the one without the hole so I can punch the hole myself exactly where I want it.  I picked up the Fiskars 1/16" hand punch at JoAnn using a 40% off coupon (ALWAYS try to use the coupons for your JoAnn purchases).


In Silhouette Studio, select the pie slices without holes and move them back onto the mat. 

To save time, you can cut all of the HTV at the same time (provided each has the same cut settings). Select each layer of the SVG and place the motifs in different sections of the mat.


Using the measurements above the mat, determine the size of each piece of HTV or Faux leather that would be required to cover the area of the mat that the pieces fit into. Make the HTV piece slightly larger than the measured size and snip off a piece of that size. The reason you want a slightly larger piece is because it helps ensure that you have a large enough piece to contain the item you are cutting and it provides a slight "fudge factor" for any instance in which the Cameo is not cutting exactly on the spot where you are expecting it to cut. The grid lines on the mat exactly match the grid lines shown in Silhouette Studio.

Depending upon the size of the pieces you cut, you may have to space the design elements further apart so that  you do not overlap any pieces of material. Don't cut the faux leather at the same time as the HTV - faux leather is much thicker and requires a significantly deeper cut than HTV. 

Traditionally, HTV needs to be mirrored but because we are applying it all to the faux leather which will be cut with the back facing up, technically the faux leather has been "mirrored", so non mirrored HTV will be the right way around for the "backwards" faux leather. You should mirror the crust backing HTV because that will be applied to the back of the (mirrored) faux leather. If you forget about mirroring anything, in this case, the pie will turn out how mine did, and since my grandmother's pumpkin pie never turned out perfectly symmetrical, the not totally perfect fit of each piece - compare my pie slices to Amy's pie slices - actually makes it look all that more authentic.

For these earrings, I selected  beige faux leather, antiqued gold HTV for the back, Rose gold foil HTV for the crust trim, orange HTV for the pie, and white glitter for the whipped cream.


Now I want some pumpkin pie!!!

HAPPY CRAFTING and have a Happy Thanksgiving!

Thursday, November 18, 2021

Making an Apron for Home Canning Season


My husband recently has gotten into baking and bread-making. He asked me to make him an apron so that he doesn't soil his clothing while cooking. Of course I was happy to make one for him, but which style? I searched for a while and stumbled upon SAM's Apron, a FREE pattern from Helen's Closet Patterns. Just sign up for their newsletter (as of 11/13/2021, that works - I don't know how long it will stay as a free pattern), and you'll receive a link to download the pattern. The image above is of Sam Himself, modeling the apron.  

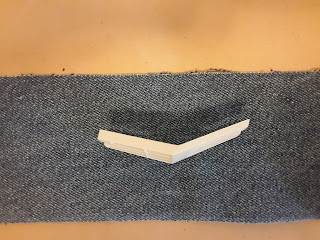
SAM's Apron sounds perfect for him - all the other apron patterns I've come across usually only consider girth, but don't provide options for different heights. This apron has cut lines for people 5' to 6' tall in 4" increments, ensuring that the bib portion and the hem are appropriate lengths for people of varying heights. Huzzah. 

Trim lines for different heights at the hem - select the length that works for you, whether you're 5', 5'8", or even 6' tall.  


And, at the TOP of the apron, it has markings for different heights - and even lines for an FBA if you need that in addition to the height adjustment. These additional marking ensure that the bib goes up high enough yet the waist isn't too high. I selected the marking that matched my husband's height and he said it was "very comfortable" and "exactly what he needed". 

The directions were very clear, and the apron went together very quickly. I used some denim I had in my stash. 


Folding up the hems. My iron was set on "steam" and the fabric pressed down so smoothly I didn't even have to use pins to hold it in place. 


The corners of the hems were especially thick because it's denim, so I used the height compensator to keep my presser foot level. The height compensator also help prevent skipped stitches and broken needles which commonly happen when sewing thick pieces. The Bernina 830 happily sewed everything I asked it to for this project. 


Pressing up the hem using a hem template. Photo may appear blurry, but it's actually clear - the smearing is actually moisture from the iron's steam. The template got very wet and warm. I chose to use the metal Dritz Hem gauge because the Clover Hot Hemmer is made of a softer material and the denim was bending it when I was trying to pull the hem up to the line.  


This is a shot of the Bernina height compensation tool that came with my Bernina 830. It has three plastic bars that allow the tool thickness to be adjusted depending upon the thickness of the material being sewn. If you need to place it at the front of the foot to keep the foot level, sew very slowly because the feed dogs may pull the tool in underneath the presserfoot and the needle could strike it and break. 


This is the "other" kind of height compensation tool I have. It came with my Pfaff Creative Vision, and is known as a "hump jumper" (they are sold separately from Pfaff machines). This device does the same thing as the one by Bernina, except you can place it at the front of the foot and sew with it underneath for a short time because of the groove. The needle will puncture it if you aren't careful. You can see a small puncture in it on the bottom right where I hit it with the needle once.


Side view of the Hump Jumper tool. Each end is a different thickness, providing two options for height compensation depending upon the thickness of the material being sewn. 

I haven't decided which version of the tool I prefer. I usually use the one that I find first when I'm digging for it. 


Apron all finished. I skipped adding the upper pocket and only installed the lower pocket (with 3 openings) because I was planning to decorate the upper portion of the apron with HTV and didn't want to have to deal with adjusting the design so that it would sit neatly above, on, and below the pocket. I think my husband is OK without the extra pocket since I didn't tell him that the pattern HAD another pocket. 

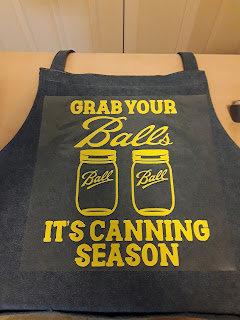
The design I put on the apron was something that my husband thought of. He enjoys canning and uses Ball brand mason jars and lids. 

I took the Ball logo from their website and edited it slightly to add the letter "s" at the end of the word "Ball". The mason jars were from a drawing of mason jars I found online, which I had to trace to make the lines wide enough so they could be seen once cut in HTV.


After creating the design in Silhouette Studio, I set the colors of the design and mat to look similar to yellow text on denim so my husband could approve it. Finally, I mirrored the whole design because HTV gets reversed when applied to objects. 


My Cameo doing its "thing": cutting out the HTV design. I was using yellow HTV, but the back of it was white. 


Almost finished! This design took a little while to cut because it was 9" x 12" and there was a lot of detail in it.


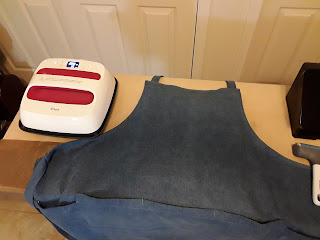
Pre-press the apron to smooth out the denim. I pressed at 335 for 15 seconds. Since the design was larger than my 9" x  9" Cricut Easy Press 2, I had to press the design several times in different areas to iron the whole thing down.  


Freshly pressed and ready for the backing to be peeled off. I like that the backing for HTV is clear so that you can place your design, check that it's straight, and move it if necessary. The slight stickiness of the backing holds the design in place once you've decided where it ought to be. 

I always use a sheet of teflon over the design to protect the Easy Press from getting goobered up from stray bits of HTV. 


Close-up of the final design on the denim apron.


The lovely and ever patient dressform models the apron, showing how nice it would look on someone.


I figured it was OK to do a little bathroom mirror shot of myself wearing the apron. I didn't manage to get a photo of my husband wearing it because he's very good at dodging the camera. 

HAPPY CRAFTING!!
Tuesday, November 16, 2021

Revised Wine Earring


I revised the wine glass earrings. As I had mentioned in my earlier post, I thought that the shape looked a little odd when I finished it but because that was the last of my black faux leather, I had to attempt to fix it by cutting it with scissors. Below is the original version.


Below is the design set that it came from. You can see the odd shape of the top of the wine. It doesn't quite work for me, so I cut it straight across to remove the curl.


You can find the Wine Earrings set at Creative Fabrica

Because the designs turn out narrow in many places once sized down as earrings, I recommend that you cut the shapes in HTV and apply to the leather teardrop shape as I did for the design on the top row, second from left. 


I definitely want to do more of the wine designs using the holographic HTV because I love the dynamic coloring that it has - depending upon what it's near, it appears to be a slightly different color. Some of the foil HTV could also work well because it's reflective. 

Watch this blog for future posts of additional cool earrings and projects. 


HAPPY CRAFTING!!

A Tale of Two Singer 15s : 1921 vs 1953. What Changed? What Stayed the Same?

 In my last post, I introduced my "newest" (yet oldest) Singer 15 ~ a Singer 15 manufactured in 1921 .  This wasn't my first S...